






Introduction
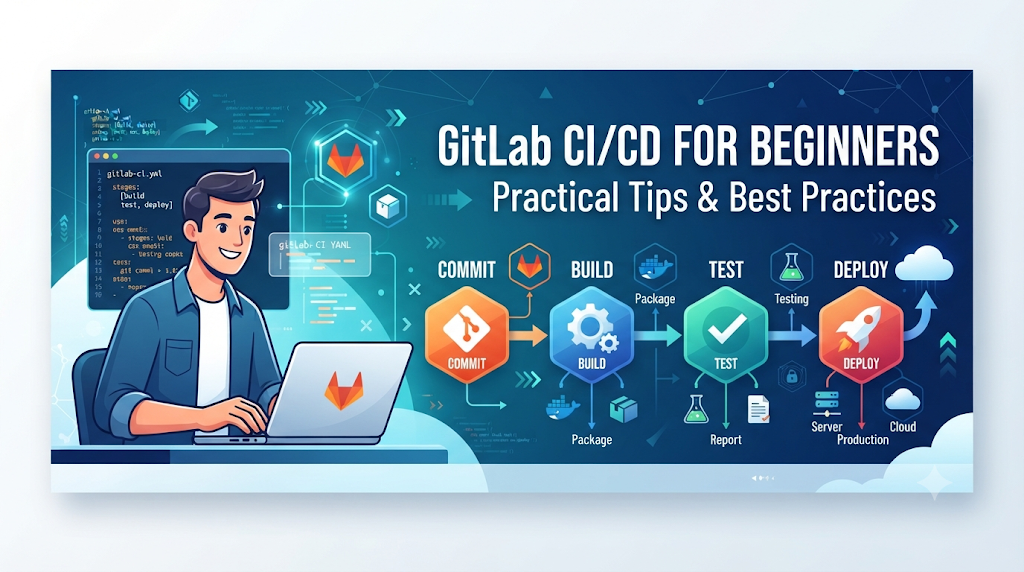
Automating how software is built, tested, and delivered is one of the fastest ways to improve development speed and code quality. GitLab CI/CD (Continuous Integration and Continuous Delivery) brings this automation directly into your repository, allowing every commit or merge request to trigger automated builds, test suites, security scans, and deployments without manual intervention. For anyone writing their first .gitlab-ci.yml file, however, getting a pipeline to pass consistently can feel frustrating. A single misaligned space can trigger cryptic YAML syntax errors, jobs can sit indefinitely in a pending state due to missing runners, and misunderstood dependencies often cause downstream tasks to fail unexpectedly.
Whether you are practicing through hands-on labs on DevOpsSchool or setting up automation for your first software project, building good habits early saves hours of trial and error. This guide shares eleven practical GitLab CI/CD tips for beginners to help you structure clean YAML files, manage runners and variables safely, troubleshoot failed logs with confidence, and create reliable pipelines from scratch.
Get Comfortable With the GitLab Project Environment
Before writing a single line of pipeline configuration, take time to understand how GitLab organizes code and automation. A pipeline does not exist in isolation; it reacts directly to events happening across your repository and project settings.
- Projects and Repositories: A GitLab project holds your Git repository, issue tracker, container registry, and CI/CD configuration. GitLab detects your pipeline automatically when it finds a file named
.gitlab-ci.ymlin the root directory of your repository. - Branches and Commits: Every push to a branch can trigger a pipeline. Understanding which branch received a commit matters because you will often configure production deployments to run only on your main branch while running lightweight checks on feature branches.
- Merge Requests: Merge requests (MRs) allow developers to propose changes and review code before merging it into a target branch. GitLab can trigger specialized merge request pipelines that validate changes before they ever touch your main codebase.
- Pipeline Interface: Under Build > Pipelines in the left sidebar, you can view every pipeline run, see which commit triggered it, check overall status badges (passed, failed, running, pending, or canceled), and inspect a visual graph of how stages and jobs connect.
- Job Logs: Clicking on any individual job inside a pipeline opens its execution log. This terminal output shows the exact commands executed, environment setup steps, compiler warnings, test results, and error messages.
- CI/CD Settings: Located under Settings > CI/CD, this area lets you configure secret variables, manage runner availability, set up protected environments, and control general pipeline behavior without modifying repository files.
- Runner Configuration: GitLab itself coordinates pipelines, while separate worker processes called GitLab Runners actually execute the commands inside your jobs. Checking which runners are active and online in your project settings saves hours of unnecessary debugging.
In a typical workflow, a developer commits code to a feature branch, pushes it to the GitLab repository, and opens a merge request. GitLab reads .gitlab-ci.yml, schedules the defined jobs, assigns them to available runners, and reports the pass or fail status directly inside the merge request interface.
Tip One: Keep Your First Pipeline Small
One of the most frequent mistakes beginners make is trying to build an enterprise-grade, ten-stage pipeline on day one. When a large configuration fails on the first run, pinpointing whether the issue lies in your YAML syntax, your build tool, or your deployment credentials becomes unnecessarily difficult.
Start with a minimal pipeline that proves your repository can check out code, build the application, and run a basic verification step. Once that foundation runs consistently, you can add security scans, packaging steps, and deployment stages incrementally.
Below is a clean, beginner-friendly .gitlab-ci.yml example for a Node.js application:
YAML
stages:
  - build
  - test

default:
  image: node:20-alpine

build-app:
  stage: build
  script:
    - echo "Installing dependencies and building the application..."
    - npm ci
    - npm run build

unit-tests:
  stage: test
  script:
    - echo "Running automated unit tests..."
    - npm test
Understanding the Core Sections
stages: Defines the sequential phases of your pipeline. Here,buildexecutes first, andtestexecutes only afterbuildsucceeds.default: Sets fallback properties for every job in the file. Definingimage: node:20-alpinetells Docker-based runners which container image to spin up for each job.build-appandunit-tests: These are top-level keys representing individual jobs.stage: Assigns a job to one of the stages listed understages.script: A list of shell commands that the runner executes in order. If any command returns a non-zero exit code, the job fails immediately.
Tip Two: Understand Jobs, Stages, and Dependencies
Beginners often confuse jobs and stages, leading to pipelines that either run too slowly or execute tasks in the wrong order.
A stage is a logical phase in your delivery lifecycle (such as build, test, or deploy). A job is a specific task that runs inside a stage (such as compile-backend, lint-frontend, or run-unit-tests).
How Execution Order and Parallelism Work
- Stage Execution Order: Stages run strictly in the order listed under the
stageskeyword. Stage 2 will not start until all jobs in Stage 1 finish successfully. - Jobs Within a Stage: Multiple jobs assigned to the same stage run in parallel, provided enough runners are available. For example,
lint-codeandunit-testscan both belong to theteststage and execute simultaneously. - Failure Behavior: By default, if any job in a stage fails, the entire pipeline stops and marks subsequent stages as skipped. You can override this for non-critical jobs using
allow_failure: true. needsRelationships: Sometimes a job in a later stage only depends on one specific job from an earlier stage rather than the entire stage. Using theneedskeyword creates a Directed Acyclic Graph (DAG) relationship, allowing a job to start as soon as its required upstream job finishes.
YAML
stages:
  - build
  - test
  - package

build-frontend:
  stage: build
  script:
    - npm run build:frontend

build-backend:
  stage: build
  script:
    - go build -o bin/server ./cmd/server

package-frontend:
  stage: package
  needs: ["build-frontend"]
  script:
    - echo "Packaging frontend without waiting for backend build..."
In this configuration, package-frontend starts immediately after build-frontend succeeds, even if build-backend is still running. Use needs selectively when clear dependencies exist, rather than overcomplicating every job.
Tip Three: Write Clean and Maintainable YAML
Your .gitlab-ci.yml file is infrastructure code. Treating it with the same care as your application source code prevents syntax bugs and makes collaboration easier for everyone on your team.
Practical YAML Habits
- Use Consistent Indentation: YAML relies on spaces—never tabs—to define structure. Stick strictly to two spaces per indentation level.
- Choose Descriptive Job Names: Avoid vague names like
job1ortest_step. Use clear, action-oriented names likelint-python-codeordeploy-staging. - Eliminate Duplicated Commands: If three jobs all need to install the same command-line utility before running, put those setup commands inside
before_scriptunderdefaultor reuse a YAML anchor/extendsblock. - Organize Long Configurations: Group related jobs together, separate sections with clear comments (
# --- Testing Jobs ---), and keep global settings (stages,variables,default) at the top of the file. - Validate Before Committing: Use the Pipeline Editor (Build > Pipeline Editor) inside GitLab. It includes a built-in syntax linter that checks your YAML structure and catches invalid keywords before you push broken changes to your repository.
Confusing vs. Clean Configuration
Hard-to-Read Configuration:
YAML
stages: [build, test]
job_1:
  stage: build
  image: python:3.12
  script:
  - pip install -r requirements.txt
  - python setup.py build
job_2:
  stage: test
  image: python:3.12
  script:
  - pip install -r requirements.txt
  - pytest
Clean, Maintainable Configuration:
YAML
stages:
  - build
  - test

default:
  image: python:3.12-slim
  before_script:
    - pip install --no-cache-dir -r requirements.txt

build-package:
  stage: build
  script:
    - python setup.py build

run-pytest:
  stage: test
  script:
    - pytest --verbose
In the improved version, the Python image and dependency installation are defined once in default, indentation is uniform, and job names clearly communicate their purpose.
Tip Four: Check Runner Availability Before Debugging Jobs
When you push a commit and see your pipeline sitting in a Pending state with the message “This job is stuck because you don’t have any active runners that can run this project,” the issue is usually not your script—it is runner availability.
GitLab Runners are lightweight agents that pick up jobs from the GitLab server, execute them, and send back the logs and status.
Key Runner Concepts for Beginners
- Shared vs. Self-Managed Runners: On GitLab.com, instance runners (shared runners) are maintained by GitLab and available out of the box. In self-hosted environments or specialized setups, administrators register project-specific or group-specific runners on their own virtual machines or Kubernetes clusters.
- Executors: Runners use different executors to run commands. The Docker executor runs each job in a fresh, isolated container (the most common and recommended approach), while the Shell executor runs commands directly on the host machine.
- Tags: Tags match jobs with capable runners. If a runner is configured with the tag
linux-docker, a job specifyingtags: [linux-docker]will only run on that runner. Conversely, if a runner is configured not to pick up untagged jobs, any job without a matching tag will stay pending forever.
Troubleshooting Checklist for Stuck Jobs
When a job refuses to start, check these items in order:
- Navigate to Settings > CI/CD > Runners in your project.
- Verify that at least one runner has a green Online status indicator.
- Confirm that the runner is enabled for your specific project (not paused).
- Compare the
tags:defined in your.gitlab-ci.ymljob against the tags assigned to the online runner. - Check whether the runner accepts untagged jobs if your
.gitlab-ci.ymldoes not specify anytags. - Verify whether your GitLab account or group has available compute minutes (quotas) if using instance runners.
Tip Five: Use Variables Instead of Hardcoding Values
Hardcoding server IP addresses, deployment paths, API keys, or database passwords directly inside .gitlab-ci.yml creates two major problems: it makes your pipeline rigid across environments, and it exposes sensitive credentials to anyone with read access to your Git history.
GitLab CI/CD variables allow you to inject configuration values dynamically when a pipeline runs.
Types of Variables in GitLab
| Variable Type | Where It Is Defined | Best Use Case |
| Predefined Variables | Built into GitLab automatically | Accessing metadata like $CI_COMMIT_BRANCH, $CI_COMMIT_SHORT_SHA, or $CI_PROJECT_NAME. |
| YAML Variables | Inside .gitlab-ci.yml under variables: | Non-sensitive settings such as APP_ENV: "staging" or LOG_LEVEL: "info". |
| Project Variables | Settings > CI/CD > Variables | Secrets, API tokens, and deployment credentials specific to one repository. |
| Group Variables | Group Settings > CI/CD > Variables | Shared credentials (like container registry tokens) used across multiple projects. |
Securing Sensitive Variables
When adding secrets in the GitLab UI, always configure these security flags:
- Protected: Ensures the variable is passed only to pipelines running on protected branches (like
main) or protected tags. This prevents a developer from opening a feature branch and printing your production password in a job log. - Masked: Hides the variable’s value in job logs by replacing it with
[MASKED]if it accidentally gets echoed to the console. - Environment Scope: Restricts a variable (such as
DEPLOY_TARGET_URL) to a specific environment likestagingorproduction.
YAML
variables:
  APP_NAME: "inventory-service"

deploy-staging:
  stage: deploy
  environment:
    name: staging
  script:
    - echo "Deploying $APP_NAME commit $CI_COMMIT_SHORT_SHA"
    - ./scripts/deploy.sh --token "$STAGING_DEPLOY_TOKEN"
Notice how $APP_NAME comes from the YAML file, $CI_COMMIT_SHORT_SHA is provided automatically by GitLab, and $STAGING_DEPLOY_TOKEN is stored securely in the project’s CI/CD settings.
Tip Six: Manage Dependencies, Artifacts, and Cache Properly
A common point of confusion for beginners is understanding how files move—or fail to move—between jobs. Because each job typically starts in a clean container environment, files generated in job-a do not automatically exist in job-b. GitLab solves this using artifacts and caches, which serve two distinct purposes.
Artifacts vs. Cache
- Artifacts are outputs produced by a job (such as compiled binaries, packaged
.jarordist/folders, or JUnit XML test reports) that must be passed to downstream jobs in the same pipeline or downloaded by users from the GitLab UI. - Cache is used to store third-party dependencies downloaded from the internet (such as
node_modules/,.venv/, or Maven.m2/directories) so future pipelines do not have to download them from scratch every single time.
Practical Configuration Example
YAML
stages:
  - build
  - test

build-web:
  stage: build
  cache:
    key:
      files:
        - package-lock.json
    paths:
      - node_modules/
  script:
    - npm ci
    - npm run build
  artifacts:
    paths:
      - dist/
    expire_in: 1 day

verify-build:
  stage: test
  dependencies:
    - build-web
  script:
    - ls -la dist/
    - ./scripts/verify-bundle.sh
Best Practices for Artifacts and Caching
- Always Set
expire_inon Artifacts: Without an expiration period, build artifacts accumulate on your GitLab server and consume disk space. Settingexpire_in: 1 dayor1 weekkeeps storage clean. - Use Lockfiles for Cache Keys: Using
key: files: [package-lock.json](orrequirements.txt/go.sum) automatically invalidates and rebuilds the cache whenever you add or upgrade a dependency, preventing stale dependency bugs. - Keep Artifact Paths Narrow: Only include the compiled output directory (
dist/orbuild/), never your entire source tree ornode_modules/.
Tip Seven: Make Testing a Regular Pipeline Activity
A CI/CD pipeline without automated testing is simply an automated way to deploy broken code faster. Making tests a mandatory gate in your pipeline ensures that regressions are caught within minutes of a commit rather than discovered by end users.
Layering Your Automated Checks
- Code Linting and Formatting: Fast checks (such as
eslint,flake8, orgofmt) that catch syntax issues and style violations in seconds. - Unit Tests: Isolated tests that verify individual functions or classes without needing external databases or networks.
- Integration Tests: Tests that verify how your application interacts with databases, caches, or internal APIs (often using GitLab
services:to spin up a temporary PostgreSQL or Redis container). - Test Reports: Configure your test runner to output JUnit-compatible XML reports and attach them using
artifacts: reports: junit:. GitLab parses these files and displays pass/fail summaries directly inside merge requests.
YAML
unit-test:
  stage: test
  script:
    - pytest --junitxml=report.xml
  artifacts:
    when: always
    reports:
      junit: report.xml
    expire_in: 3 days
Adding when: always under artifacts is critical for test jobs: it guarantees that GitLab still uploads and displays the report.xml failure details even when pytest exits with an error.
Tip Eight: Use Rules to Control When Jobs Run
By default, GitLab attempts to run every job on every commit across every branch. As your project grows, running full integration suites and deployment scripts on every minor documentation edit wastes compute time and creates unnecessary noise.
The rules keyword gives you fine-grained control over when a job should execute, run manually, or be skipped.
Common rules Scenarios
- Branch-Based Execution: Run deployment jobs only when code lands on
main. - Merge Request Pipelines: Run validation checks when a merge request is opened or updated.
- File-Change Triggers: Run backend tests only when files inside
backend/change. - Manual Approvals: Require a human click (
when: manual) before deploying to production. - Scheduled Pipelines: Run heavy end-to-end test suites overnight using
$CI_PIPELINE_SOURCE == "schedule".
YAML
deploy-production:
  stage: deploy
  script:
    - ./scripts/deploy-prod.sh
  environment:
    name: production
  rules:
    - if: '$CI_COMMIT_BRANCH == "main"'
      when: manual
    - when: never
In this example, deploy-production appears as a clickable manual play button only on pipelines for the main branch, and it is completely omitted from all feature branches and merge requests.
Tip Nine: Learn to Read Pipeline Logs
When a pipeline fails, beginners often fall into “guess-and-commit” loops—tweaking a line in .gitlab-ci.yml, pushing a commit, waiting three minutes, and watching it fail again. Learning to read job logs methodically turns debugging from guesswork into a straightforward process.
Step-by-Step Troubleshooting Workflow
- Find the First Failing Job: Open the pipeline graph and locate the earliest stage with a red failure icon. Downstream failures are usually just side effects of that first failure.
- Read From the Bottom Up: Scroll to the bottom of the job log first to see the final exit code (for example,
ERROR: Job failed: exit code 1), then scroll upward to find the exact command and error message that caused it. - Check Runner and Image Details: The top lines of every log show which runner picked up the job, which Docker image was pulled, and whether Git successfully cloned the repository.
- Verify Environment Context: If a script complains about a missing variable or wrong directory, add temporary diagnostic commands like
pwd,ls -la, orenv | sort(being careful never to print unmasked secrets). - Reproduce Locally: Pull the same container image on your own machine (
docker run --rm -it node:20-alpine sh) and run the failing commands manually. Local feedback takes seconds instead of waiting for full pipeline runs.
Common Beginner Error Scenarios
command not found: The container image you chose (such asalpine) does not include a tool you expected (likecurl,git, orpython3). Either choose a fuller image or install the package inbefore_script.Permission deniedon custom scripts: You committed a shell script (./deploy.sh) without executable permissions. Runchmod +x scripts/deploy.shlocally and commit the file mode change, or invoke it viash scripts/deploy.sh.No such file or directoryin a later stage: You forgot to declareartifacts: paths:in the earlier build job, so the compiled files were discarded when the build container shut down.
Tip Ten: Add Security Checks Early
Security works best when built into your pipeline from the beginning rather than bolted on right before a release. Even small beginner projects benefit from automated security guardrails.
Beginner-Friendly Security Practices
- Secret Detection: Enable GitLab’s built-in Secret Detection template to scan commits for accidentally committed API keys, tokens, or private keys before they spread across repository history.
- Dependency Scanning: Run language-specific vulnerability audits (such as
npm audit,pip-audit, orgovulncheck) inside yourteststage to flag third-party packages with known vulnerabilities. - Static Application Security Testing (SAST): Use static analysis tools to catch insecure coding patterns—such as SQL injection risks or hardcoded credentials—directly in your source code.
- Container Image Scanning: If your pipeline builds Docker images, scan the resulting image for operating-system and library vulnerabilities before pushing it to production registries.
- Protected Branches and Environments: Under Settings > Repository > Protected branches, restrict direct pushes to
mainso code can only enter via reviewed merge requests with passing pipelines. Combine this with protected environments so only authorized maintainers can trigger production deployments.
When introducing security jobs for the first time, consider setting allow_failure: true temporarily while you resolve existing baseline warnings, then switch to strict enforcement once your baseline is clean.
Tip Eleven: Improve Pipeline Speed Carefully
Slow pipelines frustrate developers and encourage them to batch huge changes together instead of committing frequently. However, blindly throwing complexity at a slow pipeline often introduces subtle race conditions and harder-to-debug YAML.
Practical Ways to Speed Up Pipelines
- Use Lightweight Base Images: Switching from a full operating system image (over 900 MB) to a
-slimor-alpinevariant (under 150 MB) dramatically reduces image pull times on fresh runners. - Cache Package Downloads: Cache dependency directories (
node_modules,.pip,.m2) across runs using lockfile keys. - Avoid Repeated Setup: If you build custom tooling repeatedly across every run, create a pre-built Docker image containing those tools and reference it in
image:. - Filter Unnecessary Runs with
rules: Skip expensive integration tests or build jobs when a commit only modifiesREADME.mdor documentation files (rules: changes:). - Skip Unneeded Artifact Downloads: By default, a job downloads artifacts from all previous stages. Add
dependencies: []to jobs (like linters) that do not need build outputs from earlier stages.
Before optimizing, check the Duration column on your pipeline runs to identify which specific job takes the longest. Adding ten parallel jobs will not speed up your pipeline if you only have two available runners—the extra jobs will simply wait in a queue.
Common Beginner Mistakes and How to Avoid Them
| Beginner Mistake | Impact on Your Pipeline | Simple Corrective Approach |
| Putting all tasks into one giant job | A minor test failure forces you to re-run slow dependency installs and builds from scratch; logs become hard to read. | Split distinct responsibilities into separate jobs across build, test, and deploy stages. |
| Incorrect YAML indentation or mixing tabs and spaces | GitLab rejects the pipeline immediately with a YAML syntax error before any job starts. | Configure your code editor to insert 2 spaces for tabs and validate changes in the GitLab Pipeline Editor. |
| Ignoring runner tags | Jobs remain stuck in a pending state indefinitely because no matching runner picks them up. | Check active runner tags in Settings > CI/CD > Runners and match your job tags: accurately. |
Hardcoding secrets in .gitlab-ci.yml | Credentials are exposed permanently in Git commit history and visible to anyone with repository access. | Store secrets as Protected and Masked CI/CD variables in GitLab project settings. |
| Using cache instead of artifacts for build outputs | Caches are not guaranteed to exist; downstream deploy jobs can fail randomly when a cache is cleared. | Use artifacts to pass compiled build outputs between stages; use cache only for external dependencies. |
| Creating too many unnecessary stages | Independent jobs wait sequentially instead of running in parallel, inflating total pipeline duration. | Group independent checks (linting, unit tests, security scans) into the same test stage. |
| Skipping automated tests in early pipelines | Broken code passes build checks and reaches staging or production environments undetected. | Include at least one automated test job in every pipeline before any deployment stage. |
| Guessing fixes instead of reading job logs | Wastes dozens of commits trying random YAML edits without addressing the actual root cause. | Inspect the first failing job log from the bottom up and reproduce errors locally before committing. |
Writing overly broad rules | Deployment jobs or heavy test suites run unintentionally on feature branches or merge requests. | Explicitly scope deployment rules to $CI_COMMIT_BRANCH == "main" and end rule blocks cleanly. |
| Allowing unverified builds to deploy | Failed test or security jobs still proceed to deployment when allow_failure: true is overused. | Keep allow_failure: false (the default) on critical test and security gates protecting deployment. |
A Small Practice Project: Apply the Tips Together
The best way to solidify these concepts is to build a working pipeline in a safe sandbox repository. Follow this hands-on exercise to put everything together.
Lab Setup (Sandbox Environment)
- Create a new, empty repository in your GitLab account named
gitlab-cicd-practice. - Add a simple application file (for example, a small Python or Node.js script with one function and one test file) along with a
README.md. - In Settings > CI/CD > Variables, create a non-sensitive test variable named
DEPLOY_ENVIRONMENTwith the valuepractice-sandbox(mark it as Masked).
Note: Use simulated deployment echo commands in this practice lab rather than connecting real production servers.
Create Your .gitlab-ci.yml
Create a .gitlab-ci.yml file in the root of your repository with four stages: build, test, security, and deploy.
YAML
stages:
  - build
  - test
  - security
  - deploy

default:
  image: python:3.12-slim

variables:
  APP_VERSION: "1.0.0"

# 1. Build Stage: Package the application and save an artifact
package-application:
  stage: build
  script:
    - mkdir -p build_output
    - echo "App Version $APP_VERSION - Commit $CI_COMMIT_SHORT_SHA" > build_output/release-info.txt
    - cp *.py build_output/
  artifacts:
    paths:
      - build_output/
    expire_in: 1 day
  rules:
    - changes:
        - "*.py"
        - ".gitlab-ci.yml"

# 2. Test Stage: Run automated tests using the build artifact
run-unit-tests:
  stage: test
  dependencies:
    - package-application
  script:
    - ls -la build_output/
    - python -m unittest discover
  rules:
    - changes:
        - "*.py"
        - ".gitlab-ci.yml"

# 3. Security Stage: Check for accidental secrets or risky patterns
basic-security-check:
  stage: security
  dependencies: []
  script:
    - echo "Scanning repository files for hardcoded secrets..."
    - '! grep -rnE "(PASSWORD|SECRET_KEY|API_TOKEN)\s*=\s*[\"'\''][A-Za-z0-9]+" *.py'
  rules:
    - changes:
        - "*.py"
        - ".gitlab-ci.yml"

# 4. Deploy Stage: Controlled manual deployment on main branch only
deploy-to-sandbox:
  stage: deploy
  dependencies:
    - package-application
  script:
    - echo "Deploying build artifact to $DEPLOY_ENVIRONMENT..."
    - cat build_output/release-info.txt
  rules:
    - if: '$CI_COMMIT_BRANCH == "main"'
      when: manual
    - when: never
Expected Results and Completion Checklist
- When you edit
README.mdonly: Because all jobs includerules: changes:watching*.pyand.gitlab-ci.yml, GitLab will skip creating an unnecessary pipeline run. - When you push a valid change to a
.pyfile onmain:package-applicationruns first and uploadsbuild_output/as a downloadable artifact.run-unit-testsdownloads the artifact and executes your Python unit tests.basic-security-checkruns without downloading the build artifact (dependencies: []) and scans your Python files.deploy-to-sandboxwaits in a Manual state until you click the play icon in the GitLab pipeline graph.
- Intentional Failure Test: Temporarily commit a fake
API_TOKEN = "abc12345"inside a.pyfile, push it, and observe howbasic-security-checkfails and blocksdeploy-to-sandboxfrom running. Inspect the job log to confirm the exact line caught bygrep, then revert the test secret.
Build a Learning Path Beyond the Basics
Once your first multi-stage pipeline runs reliably and you feel comfortable reading logs and managing variables, expand your skills gradually through targeted mini-projects rather than trying to learn every feature at once.
- Docker Image Builds: Learn to build container images inside your pipeline using Docker-in-Docker (
docker:dind) or rootless builders like Kaniko, and push tagged images directly to the built-in GitLab Container Registry. - Parallel and Matrix Jobs: Use the
parallel: matrix:keyword to test your application simultaneously across multiple runtime versions (such as Python 3.10, 3.11, and 3.12) without duplicating job definitions. - Reusable Pipeline Templates: Extract common build and test logic into shared YAML templates and import them across multiple repositories using the
include:keyword. - Child Pipelines: For monorepos containing multiple independent microservices, trigger dynamic parent-child pipelines so each service manages its own build and deployment lifecycle cleanly.
- Infrastructure as Code (IaC) Automation: Integrate tools like Terraform or OpenTofu into your pipeline to run
planchecks on merge requests and controlledapplyjobs on protected branches. - Kubernetes Deployments: Connect your GitLab project to a Kubernetes cluster using the GitLab Agent for Kubernetes to automate container rollouts and environment previews.
- Compliance and Advanced Security: Adopt GitLab’s managed SAST, Dependency Scanning, and License Compliance templates to enforce organization-wide quality and security standards.
- Pipeline Performance Monitoring: Use GitLab’s CI/CD Analytics dashboard to track pipeline success rates, median duration, and failure trends over time so you can optimize bottlenecks based on real data.
Conclusion
Mastering GitLab CI/CD does not require memorizing every keyword in the official documentation on your first week. The most dependable pipelines come from applying a few core habits consistently: start small with clear stages, keep your YAML clean and validated, verify runner availability early, protect credentials with scoped variables, separate build artifacts from dependency caches, and treat every failed job log as a clear diagnostic clue rather than a setback.
As you build confidence with your initial workflows, improve one piece of your pipeline at a time—add an automated unit test suite this week, introduce a secret scan next week, and refine your rules once your branch workflow settles. Steady, incremental improvements will quickly turn your GitLab pipelines into a reliable foundation for everyday software delivery.